这些地址是不会被Internet分配的,它们在Internet上也不会被路由,虽然它们不能直接和Internet网连接,但通过技术手段仍旧可以和Internet通讯。我们可以根据需要来选择适当的地址类,在内部局域网中将这些地址像公用IP地址一样地使用。在Internet上,有些不需要与Internet通讯的设备,如打印机、可管理集线器等也可以使用这些地址,以节省IP地址资源。机器比较少的话用A B 类地址肯定是不理智的,价格也会很昂贵的。
NAT 之内的 PC 联机到 Internet 上面时,他所显示的 IP 是 NAT 主机的公共 IP,所以 Client 端的 PC 当然就具有一定程度的安全了,外界在进行 portscan(端口扫描) 的时候,就侦测不到源Client 端的 PC 。
AT的主要作用,是解决IP地址数量紧缺。当大量的内部主机只能使用少量的合法的外部地址,就可以使用NAT把内部地址转化成外部地址。
NAT还可以防止外部主机攻击内部主机(或服务器)。
ps has been replaced by other stuff, that is ps is corrupted.
how to recover
easy
RUN apt-get update && apt-get install -y procps
Procps - The /proc file system utilities
procps is the package that has a bunch of small useful utilities that give information about processes using the /proc filesystem. The package includes the programs ps, top, vmstat, w, kill, free, slabtop, and skill.
7 Ways to Determine the File System Type in Linux (Ext2, Ext3 or Ext4)
A file system is the way in which files are named, stored, retrieved as well as updated on a storage disk or partition; the way files are organized on the disk.
A file system is divided in two segments called: User Data and Metadata (file name, time it was created, modified time, it’s size and location in the directory hierarchy etc).
In this guide, we will explain seven ways to identify your Linux file system type such as Ext2, Ext3, Ext4, BtrFS, GlusterFS plus many more.
1. Using df Command
df command reports file system disk space usage, to include the file system type on a particular disk partition, use the -T flag as below:
$ df -Th
OR
$ df -Th | grep "^/dev"
df Command – Find Filesystem Type
For a comprehensive guide for df command usage go through our articles:
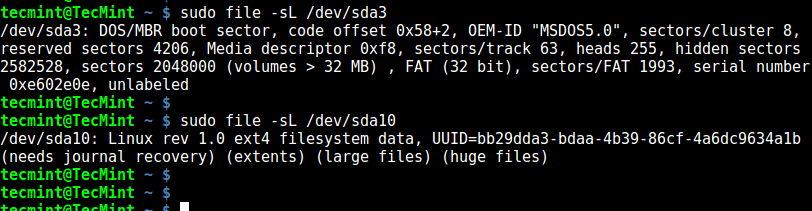
file command identifies file type, the -s flag enables reading of block or character files and -L enables following of symlinks:
$ sudo file -sL /dev/sda3
file – Identifies Filesystem Type
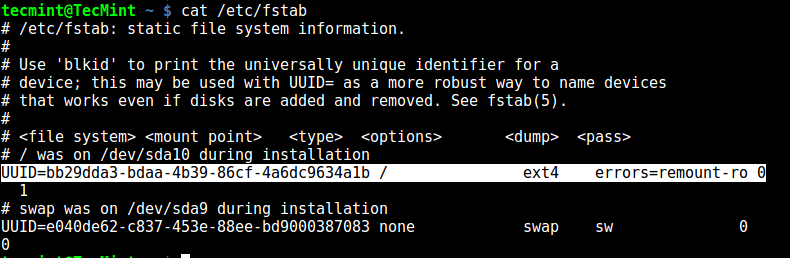
7. Using fstab File
The /etc/fstab is a static file system info (such as mount point, file system type, mount options etc) file:
$ cat /etc/fstab
Fstab – Shows Linux Filesystem Type
That’s it! In this guide, we explained seven ways to identify your Linux file system type. Do you know of any method not mentioned here? Share it with us in the comments.
Brief: This tutorial shows you a few essential things to do after installing Arch Linux. This will help you get started with Arch Linux so that you can explore it further.
Earlier I showed you how to install Arch Linux. Today, I am going to list a few basic and yet important things to do after installing Arch Linux.
By this time, you probably already know that Arch Linux comes with a minimal installation and lets you build your own system on top of it. From installing desktop environments to media codecs and your favorite applications, everything has to be done by you.
This do-it-yourself (DIY) approach is what many Arch Linux users prefer. If you want things running out of the box, you should use Manjaro Linux. Manjaro is based on Arch minus the hassle.
Cutting down the chit-chat, let’s see what to do after installing Arch Linux.
Must to do things after installing Arch Linux
While at It’s FOSS, we focus on beginner centric approach and hence we suggest plenty of GUI based approach, this won’t be the case here.
Arch Linux is sort of expert domain and we believe if you use Arch, you are not afraid of using the terminal. This is why the steps mentioned here are command line based.
0. Update your system
You might already have used the latest release, but it’s advisable to check for the latest update for your Arch System:
sudo pacman -Syu
1. Installing X server, Desktop Environment and Display Manager
Before installing a desktop environment (DE), you will need to install the X server.
You will also need a display manager to log in to your desktop environment. For the ease, you can install LXDM.
pacman -S lxdm
Once installed, you can enable to start each time you reboot your system.
systemctl enable lxdm.service
Reboot your system and you will see the LXDM login screen, select your desktop environment from the list and login.
This is how my system looks like with LXDM and GNOME.
Arch Linux with GNOME and LXDM
2. Install an LTS kernel
Why should you install LTS kernel in Arch Linux when it is supposed to be cutting edge?
Installing an LTS kernel means you have a more stable kernel with better support to older hardware. Also, the LTS kernels are supported for at least 2 years with bug fixes and performance enhancements.
If you rather choose to use the latest Linux kernel, you may find regression and bugs introduced by the latest kernel updates to your existing software and system. It’s not a certainty but it is definitely a possibility. For example, a Kernel update broke GNOME in Arch based Linux some time back.
This is why it is advisable to use an LTS kernel if you prefer a more stable system and/or have an older one. But the decision is yours to make.
At this point, the LTS version is the default one.
Once done, you can remove the older kernels by typing the below command. However, I prefer to keep it in “case” something goes wrong, I can boot into the other Linux kernel version.
Yaourt stands for Yet AnOther User Repository Tool which can be used to search, download and install packages from the official repository as well as AUR.
Arch User Repository or AUR is a community-driven repository for Arch users and contains package descriptions to compile a package from source and install it. Most of the packages that make to the official repository start in the AUR first. Users contribute their own applications which are voted for or against and once it becomes popular enough, they are included in the official repository.
AUR contains lots of useful applications that are not found in the main repo can be installed from AUR with help of Yaourt. Yaourt is similar to what Synaptic Package Manager does, and can be installed by following these steps:
Open /etc/pacman.conf file and add these lines at the bottom:
[archlinuxfr]
SigLevel = Never
Server = http://repo.archlinux.fr/$arch
Save the change. Install Yaourt with the below command
sudo pacman -Syu yaourt
Use the command below to sync Yaourt with AUR:
yaourt -Syy
To install AUR packages, you can the below commands :
yaourt -S package-name
4. Install GUI Package Manager Pamac
The default package manager for Arch Linux is Pacman (Package Manager) and using Pacman is quite easy to install or remove a software.
However, it’s sometimes difficult to talk in commands. Pamac provides a GUI option for Pacman and works like Synaptic Package Manager or GNOME Software.
Pamac serves as a GUI tool for installing or updating packages and works well with Arch User Repository AUR.
How to install Pamac
Before you can use Pamac, you will need to have Yaourt (or Packer) installed first. Once done, type the below command in terminal to install Pamac.
yaourt -S pamac-aur
You can launch the GUI by searching for Add/Remove Software. It will show different packages that are available and installed and which all updates are needed.
Pamac Package Manager
However, by default, the AUR packages are not enabled. To enable it, click on the options just beside the search option) and choose Preferences. Under the AUR tab, Enable AUR support.
Enable AUR support in Pamac
Installing software through Pamac is as easier as searching it through the GUI (which searches the community and AUR) and installing it with a click.
5. Installing Codecs and plugins
Of course, you are going to use your personal system for recreational works like watching videos and listening to your favorite song. But before that, you will have to install codecs for these audio and video files.
However, installing a media player like VLC imports all the necessary codecs and installs it.
sudo pacman -S vlc
You may add a music player too:
sudo pacman -S amarok
6. Installing productive software
For day to day use and setting up your Arch system for productive use, you need some basic applications like an office suite, email client, a web browser etc.
Aria2 is a download manager, LibreOffice is the most popular open source office suite, Thunderbird is a cross-platform mail and chat client, Firefox is an open source and free web browser, Gedit is an editor, flashplugin installs flash, Skype is a popular messaging and video calling software and Dropbox – to store your file for anytime access.
Along with these, you will need archive managers
sudo pacman -S p7zip p7zip-plugins unrar tar rsync
This is of course just a suggestion. You can install essential Linux applications of your choice and your requirement.
7. Customizing the looks of your Arch Linux desktop
You can customize your Arch Linux by installing some nice flat themes or the conky monitoring tool.
Installing themes
Some of the most liked themes are Arc GTK, flatplat, Vertex and Numix, which can be installed by below command:
Go to settings > Appearance and change the default theme from there.
Installing Conky
Conky is a free system manager application which can monitor and display memory usage, CPU statistics, disk storage, swap, CPU temperature and more.
To install conky, use below command :
sudo pacman -S conky
You can configure conky yourself which will need some digging into the ~/.conkyrc file or you can download your favorite one from web and replace the default conkyrc file. There is a detailed tutorial about conky and its configuration on the Arch Linux website.
Additional tip:
At any point in time, if you feel like removing any application (and its dependencies), you can use these commands:
sudo pacman -R package-name
It removes the package without removing the dependencies. If you want to remove the dependencies but leaving out the ones which are being used by some other application, below command will help:
sudo pacman -Rs package-name
Final Words
Arch Linux is a great distribution if you want to take control of everything, from setting up your favorite desktop environment to the tools you want to use. The Arch Wiki is a great place to learn these things and in itself more than sufficient.
In this article, we have just listed out the most important things to do after installing Arch Linux. The rest is up to you to explore.
By the way, what are the things you do after installing Arch Linux?